Lighting is the unsung hero of any golf simulator setup. It’s the secret ingredient that transforms a mediocre experience into an immersive, true-to-life golfing adventure. But getting the lighting just right can be tricky. You’ve got to consider your room size, screen material, projector’s quirks, and a whole host of other factors.
This ultimate guide will illuminate the path to golf simulator lighting perfection. We’ll discuss the science behind golf simulator lighting, the different types of lighting, the impact on performance, and the key factors you need to consider when designing your dream setup.
- 1) Understanding Golf Simulator Lighting
- 2) Factors to Consider When Choosing Golf Simulator Lighting
- 3) Optimal Lighting Setup for Golf Simulators
- 4) DIY Golf Simulator Lighting Solutions
- 5) Maintenance and Troubleshooting
-
6)
Frequently Asked Questions
- 6.1) What is the best color temperature for golf simulator lighting?
- 6.2) Can I use natural lighting for my golf simulator?
- 6.3) How many lumens do I need for optimal golf simulator lighting?
- 6.4) Are there any specific brands of lighting recommended for golf simulators?
- 6.5) Can poor lighting affect my golf simulator’s sensor accuracy?
- 7) Final Thoughts
Understanding Golf Simulator Lighting
Let’s start by exploring how the lighting of your golf sim setup can make your virtual experience or break it.
The Role of Lighting in Creating an Immersive Golfing Experience
Lighting plays a crucial role in creating an immersive golfing experience in your simulator. It’s not just about visibility; it’s about replicating the outdoor environment.
Proper lighting can mimic the sun’s position, create realistic shadows, and even simulate different times of day. This attention to detail is what transforms your simulator from a mere gaming tool to a true golfing experience.
Different Types of Lighting Used in Golf Simulators
Golf simulators employ various types of lighting to achieve the desired effect. Let’s take a closer look at the three main categories:
Overhead Lighting
Overhead lighting is the primary source of illumination in most golf simulators. It provides general visibility and can be adjusted to simulate different times of the day.
Overhead lighting is typically achieved using LED panels or fluorescent fixtures.
Spotlight Lighting
Spotlight lighting is used to highlight specific areas of the simulator, such as the hitting mat or the screen. This type of lighting creates contrast and depth, making the virtual environment feel more realistic.
Spotlights can be adjustable, allowing you to fine-tune the lighting to your preferences.
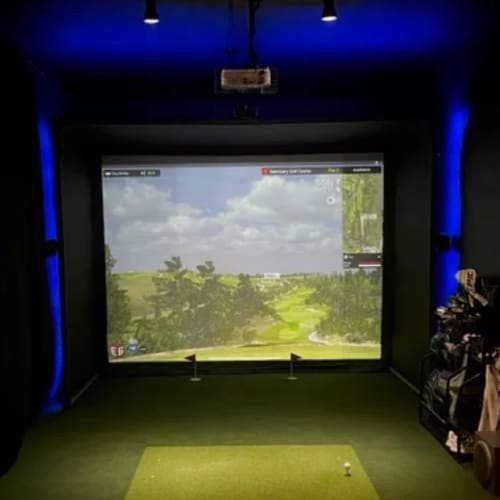
Ambient Lighting
Ambient lighting is the soft, indirect light that fills the room. It helps reduce harsh shadows and glare, creating a more comfortable environment. Ambient lighting can be achieved through the use of wall sconces, floor lamps or even LED strip lights.
The Impact of Lighting on Golf Simulator Performance and Accuracy
Lighting doesn’t just affect the ambiance of your golf simulator; it can also impact its performance and accuracy. Insufficient or poorly placed lighting can create shadows on the screen, making it difficult for the simulator’s sensors to track the ball accurately. This can lead to frustration and inconsistent results.
On the other hand, a well-lit simulator can enhance your experience and improve your game. Proper lighting ensures that the sensors can track the ball’s flight path accurately, providing reliable data to analyze your swing and make improvements.
The next time you step into your golf simulator, take a moment to appreciate the lighting. It’s not just there to help you see; it’s an integral part of the immersive experience that makes golf simulators so enjoyable.
Factors to Consider When Choosing Golf Simulator Lighting
Choosing the right lighting for your golf simulator isn’t as simple as flipping on a switch. There are several factors you need to consider to optimize your setup and create the perfect golfing environment.
Room Size and Dimensions
The size and shape of your simulator room play a significant role in determining the type and amount of lighting you’ll need. A larger room will require more powerful lighting to adequately illuminate the space, while a smaller room may need a more focused lighting setup to avoid glare and shadows.
Take measurements of your room length, width and height, and consider any obstacles or features that may affect your lighting placement, such as low ceilings or support beams.
For an in-depth exploration of space requirements for a golf simulator setup, see our article about whether 10 feet width is enough.
Simulator Screen Material and Size
The material and size of your simulator screen can also impact your lighting choices. Different screen materials have varying levels of reflectivity and light absorption, which can affect the quality and brightness of your projected image.
If you have a larger screen, you’ll need more powerful lighting to evenly illuminate the entire surface. On the other hand, a smaller screen may require a more focused lighting setup to avoid washout and glare.
Projector Specifications and Requirements
Your projector’s specifications, such as its lumens output and throw distance, will also influence your lighting decisions. A projector with higher lumens output will require less ambient lighting to produce a clear image, while a projector with a shorter throw distance may need more focused lighting to avoid shadows and hot spots.
Review your projector’s manual and specifications to determine the ideal lighting conditions for optimal performance.
Where to mount a projector for golf simulator is also a crucial factor. Optimal projector placement for golf simulators will depend on your screen size, room layout, and desired viewing experience to ensure you achieve the best possible image quality.
Budget and Cost Considerations
Lighting can be a significant investment, especially if you’re looking for high-quality, professional-grade equipment. Before you start shopping, determine your budget and prioritize your lighting needs.
Consider the long-term costs of your lighting setup, including energy consumption and replacement bulbs. Investing in energy-efficient lighting, such as LED bulbs, can help you save money in the long run.
Energy Efficiency and Sustainability
Speaking of energy efficiency, it’s important to consider the environmental impact of your lighting choices. Opting for energy-efficient lighting not only helps you save on your energy bills but also reduces your carbon footprint.
Look for lighting options that offer high lumens output per watt, as these will provide the most light for the least amount of energy. You can also consider installing smart lighting controls, such as timers or motion sensors, to automatically turn off lights when they’re not in use.
Optimal Lighting Setup for Golf Simulators
The right combination of lighting fixtures, bulbs and positioning can take your simulator from a mere practice tool to a fully immersive virtual system.
Recommended Lighting Fixtures and Bulbs
With so many lighting options on the market, it can be overwhelming to choose the best fixtures and bulbs for your golf simulator. Here are three popular lighting types and their benefits:
LED Lighting
LED lights are a popular choice for golf simulators due to their energy efficiency, long lifespan and versatility. They emit minimal heat, which helps maintain a comfortable temperature in your simulator room.
LED lights also offer a wide range of color temperatures, allowing you to customize the ambiance of your space.
Fluorescent Lighting
Fluorescent lights are another energy-efficient option that provides even, diffused lighting. They work well for general room illumination and can help reduce shadows on your simulator screen. However, fluorescent bulbs may flicker or hum, which can be distracting during your golf sessions.
Halogen Lighting
Halogen bulbs offer bright, focused light that can be ideal for highlighting specific areas of your golf simulator, such as the hitting mat or the screen.
They have excellent color rendering properties, making your projected images appear more vivid and realistic. However, halogen bulbs generate more heat than LED or fluorescent options, which may affect your room temperature.
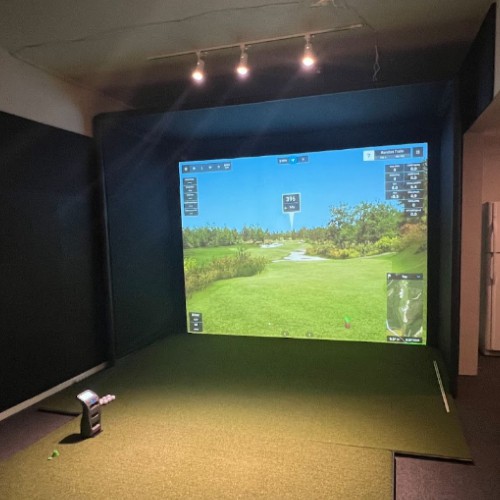
Ideal Lighting Placement and Positioning
Proper lighting placement is crucial for creating an optimal golf simulator environment. Here are some tips for positioning your lighting fixtures:
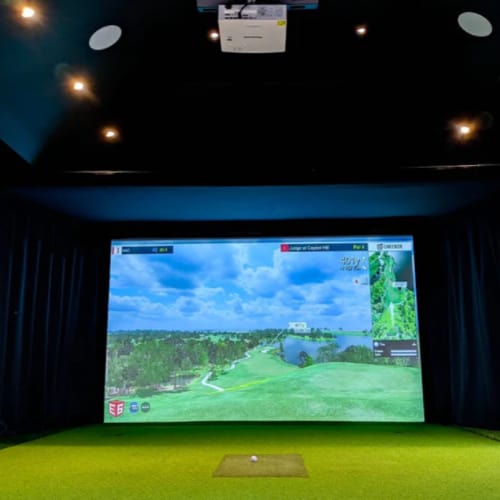
- Place overhead lights evenly across the ceiling to provide consistent illumination throughout the room.
- Use spotlights or directional lights to highlight the hitting mat and reduce shadows cast by the golfer.
- Position lights at an angle to the simulator screen to minimize glare and reflections.
- Avoid placing lights directly behind the golfer, as this can create distracting shadows on the screen.
Experiment with different lighting arrangements to find the setup that works best for your space and preferences.
Adjusting Lighting Intensity and Color Temperature
The intensity and color temperature of your lighting can greatly impact the overall feel of your simulator. Dimmer switches allow you to adjust the brightness of your lights to create the perfect ambiance for your practice sessions.
Color temperature, measured in Kelvins (K), affects the perceived warmth or coolness of the light. Lower color temperatures (2700-3000K) produce a warm, inviting atmosphere, while higher color temperatures (5000K and above) create a cooler, more energizing environment.
Consider using adjustable lighting fixtures or smart bulbs that allow you to change the color temperature and intensity to suit your preferences and the time of day.
Minimizing Shadows and Glare on the Simulator Screen
Shadows and glare on your simulator screen can be distracting and affect the clarity of your projected images. Do the following to minimize these issues:
- Use diffusers or lampshades to soften and evenly distribute the light from your fixtures.
- Opt for matte or anti-glare screen materials to reduce reflections.
- Adjust the angle and position of your lights to prevent direct glare on the screen.
- Consider using light baffles or barn doors on your spotlights to control the direction and spread of the light.
DIY Golf Simulator Lighting Solutions
You’re excited about creating the perfect lighting setup for your golf simulator, but the cost of professional installation can be a real bogey. With a little know-how and some elbow grease, you can tackle your lighting setup like a pro.
Step-by-Step Guide to Installing Your Own Lighting System
Installing your own golf simulator lighting may seem intimidating, but it’s more manageable than you might think. Here’s a step-by-step guide to help you navigate the process:
- Plan your lighting layout: Sketch out your room, noting the dimensions and desired locations for your lighting fixtures.
- Gather necessary tools and materials: You’ll need a drill, screwdriver, wire cutters, electrical tape, and your chosen lighting fixtures and bulbs.
- Install the mounting brackets: Securely attach the mounting brackets for your lights to the ceiling or walls, following the manufacturer’s instructions.
- Connect the wiring: Carefully connect the electrical wiring for each fixture, making sure to follow local building codes and safety regulations.
- Mount the lights: Attach your lighting fixtures to the mounting brackets, ensuring they are level and properly secured.
- Test and adjust: Turn on your lights and test different brightness levels and color temperatures to find your ideal settings.
Remember to prioritize safety and consult with a professional electrician if you’re unsure about any aspect of the installation process.
Tips for Repurposing Existing Lighting Fixtures
If you’re working with a tight budget, repurposing existing lighting fixtures can be a savvy way to illuminate your golf simulator. Consider these tips:
- Track lighting: Adjust the angle and position of track lighting heads to focus on key areas of your simulator.
- Floor lamps: Place tall floor lamps in the corners of your room to provide ambient lighting and reduce shadows.
- Table lamps: Use table lamps on side tables or shelves to create a cozy, inviting atmosphere in your simulator space.
- Clamp lights: Attach clamp lights to your ceiling or walls to direct light where it’s needed most.
Get creative with your existing fixtures, and don’t be afraid to experiment with different arrangements until you find a setup that works for you.
Cost-Effective Lighting Options for Budget-Conscious Golfers
Lighting up your golf simulator doesn’t have to break the bank. The following are some cost-effective lighting options that can help you save some green:
- LED bulbs: Invest in energy-efficient LED bulbs, which last longer and consume less power than traditional incandescent bulbs.
- Smart bulbs: Opt for smart bulbs that allow you to control brightness and color temperature from your smartphone or tablet, eliminating the need for separate dimmers or switches.
- String lights: Create a festive, laid-back atmosphere with string lights hung around the perimeter of your simulator room.
- Recessed lighting: If you’re handy with DIY projects, install recessed lighting fixtures yourself to save on professional installation costs.
By being resourceful and thinking outside the box, you can create a well-lit golf simulator space without overspending.
Remember, the key to a successful DIY golf simulator lighting setup is careful planning, attention to detail, and a willingness to adapt and improvise as needed. With these tips and tricks up your sleeve, you’ll be ready to tackle your lighting project with confidence and finesse.
Maintenance and Troubleshooting
You’ve put in the work to create the perfect lighting setup for your golf simulator, but the job doesn’t end there. Like your golf swing, your lighting system requires regular maintenance and occasional troubleshooting to keep it performing at its best.
Regular Cleaning and Upkeep of Lighting Fixtures
Just like your golf clubs, your lighting fixtures need a bit of TLC to stay in top shape. Dust, dirt, and debris can accumulate on your lights over time, reducing their brightness and efficiency. Here’s how to keep your lights shining:
- Dusting: Use a soft, dry cloth or a microfiber duster to gently remove dust from your light fixtures and bulbs.
- Cleaning: For a deeper clean, turn off and unplug your lights, then wipe them down with a damp cloth and mild cleaning solution. Be sure to dry them thoroughly before turning them back on.
- Bulb replacement: Monitor your bulbs and replace them as needed to maintain optimal brightness and color temperature.
Regular cleaning and maintenance will help extend the life of your lighting system and keep your golf simulator looking its best.
Identifying and Addressing Common Lighting Issues
Even with proper maintenance, lighting issues can sometimes arise. Here are a few common problems and how to address them:
Flickering or Dimming Lights
If your lights are flickering or dimming, there could be several culprits:
- Loose connections: Check your wiring and ensure all connections are secure.
- Faulty bulbs: Try replacing the affected bulbs to see if that solves the issue.
- Voltage fluctuations: If the problem persists, consult with an electrician to check for voltage irregularities.
Inconsistent Lighting Coverage
Uneven lighting can create distracting shadows and affect your simulator’s performance. To remedy this:
- Adjust fixture placement: Experiment with moving your lights to achieve more even coverage.
- Add or remove fixtures: You may need to add or remove lighting fixtures to balance the illumination in your space.
- Use diffusers: Consider adding diffusers to your lights to help spread the light more evenly.
Overheating or Malfunctioning Bulbs
If your bulbs are overheating or malfunctioning, it’s essential to address the issue promptly to avoid damage to your fixtures or simulator:
- Check for proper ventilation: Make sure your lights have adequate airflow to prevent overheating.
- Use the correct wattage: Ensure you’re using bulbs with the appropriate wattage for your fixtures to avoid overheating or premature burnout.
- Replace malfunctioning bulbs: If a bulb is flickering, buzzing, or not turning on, replace it with a new one.
When to Seek Professional Assistance?
While many lighting issues can be resolved with a bit of DIY know-how, some problems may require professional help. If you encounter any of the following situations, it’s time to call in the pros:
- Electrical safety concerns: If you notice sparks, smoke or burning smells coming from your lighting fixtures, shut off the power immediately and contact an electrician.
- Complex wiring issues: If you’re experiencing persistent wiring problems or need to modify your electrical setup, consult with a licensed electrician to ensure the work is done safely and up to code.
- Warranty repairs: If your lighting fixtures are still under warranty, contact the manufacturer for guidance on repairs or replacements.
Remember, when it comes to electrical work, safety should always be your top priority. When in doubt, don’t hesitate to seek professional assistance.
Frequently Asked Questions
You’ve learned the ins and outs of golf simulator lighting, but you might still have additional questions. Here are some of the most common queries golfers have about lighting up their virtual greens.
What is the best color temperature for golf simulator lighting?
The ideal color temperature for your golf simulator depends on personal preference and the type of atmosphere you want to create. Generally, a color temperature between 4000K and 6000K provides a bright, daylight-like environment that mimics outdoor conditions. However, some golfers prefer a warmer, more inviting ambiance and opt for lower color temperatures around 3000K.
Can I use natural lighting for my golf simulator?
While natural lighting can be a great energy-saving option, it’s not always practical or consistent for golf simulator setups. The sun’s position and cloud cover can create varying light levels and shadows throughout the day, affecting your simulator’s performance. For the best results, it’s recommended to use artificial lighting that you can control and adjust as needed.
How many lumens do I need for optimal golf simulator lighting?
The number of lumens required for your golf simulator depends on factors such as room size, screen size, and projector brightness. A general rule of thumb is to have at least 50 lumens per square foot of screen space. For example, if your screen is 10 feet wide and 8 feet tall, you’ll need a minimum of 4,000 lumens (10 x 8 x 50) for optimal brightness.
Are there any specific brands of lighting recommended for golf simulators?
There are several reputable lighting brands that offer high-quality fixtures suitable for golf simulators. Some popular options include:
– Philips Hue: Known for their smart, adjustable lighting solutions.
– Cree Lighting: Offers a wide range of energy-efficient LED fixtures.
– GE Lighting: Provides reliable, cost-effective lighting options for various applications.
– Sylvania: Delivers high-performance lighting products for both residential and commercial use.
Ultimately, the best brand for your golf simulator will depend on your specific needs, budget and personal preferences.
Can poor lighting affect my golf simulator’s sensor accuracy?
Absolutely! Inadequate or poorly placed lighting can create shadows and glare on your simulator screen, making it difficult for the sensors to track the ball accurately.
This can lead to frustrating miscalculations and inconsistencies in your shot data.
Final Thoughts
Congratulations! You’ve made it through the ultimate guide to golf simulator lighting. By now, you should have a solid understanding of the critical role lighting plays in creating an immersive, high-performance golfing experience right in your own home.
Proper lighting enhances realism, improves performance, increases durability, and promotes energy efficiency. While it may be tempting to cut corners, investing in quality fixtures and bulbs pays off in the long run.
Remember, there’s no one-size-fits-all solution when it comes to golf simulator lighting. Experiment with different options, placements and configurations until you find the perfect arrangement for your space and preferences.
Ready to take the next step and build your dream golf simulator? We recommend checking out our comprehensive guide on how to build your DIY golf simulator.
Please leave any questions or comments you still have in the comments section below, or send us an email.
Happy golfing!