

A reliable golf cart battery is essential for a smooth and uninterrupted round of golf. Regular testing and maintenance can prevent frustrating scenarios where your cart fails to start, leaving you stranded on the course.
This comprehensive guide will provide the knowledge and tools necessary to properly test and maintain your golf cart battery. We’ll explore the different types of cart batteries, their anatomy and the key factors that affect their performance. By understanding these aspects, you’ll be better equipped to keep your battery in top condition.
We will also cover the essential tools and techniques for battery testing, as well as the recommended timing for regular maintenance.
- 1) Why should you test your golf cart battery regularly?
- 2) The importance of maintaining a healthy battery for optimal performance
- 3) Signs of a bad battery and when it needs to be replaced
- 4) Understanding Golf Cart Batteries
- 5) Tools and Equipment Needed for Testing
- 6) Preparing to Test Your Golf Cart Battery
- 7) Testing the Battery Voltage
- 8) Load Testing the Battery
- 9) Maintaining and Extending Battery Life
- 10) Charging and Recharging the Battery
- 11) Testing in Extreme Temperatures
-
12)
Frequently Asked Questions
- 12.1) Why is it important to test golf cart batteries?
- 12.2) What are the recommended methods for testing golf cart batteries?
- 12.3) What is the significance of using a hydrometer for testing golf cart batteries?
- 12.4) How do I verify the results of the battery tests?
- 12.5) What should I do if I suspect issues with my golf cart battery?
- 13) Final thoughts
Why should you test your golf cart battery regularly?
Individual cells in your battery need a thumbs-up for health and harmony; one bad apple can throw the whole barrel out of whack. Testing ensures each cell pulls its weight for your golf cart’s group effort. And when it’s not just a bad battery but perhaps a sneaky issue lying in wait—regular checks help you track down the true troublemaker.
For added security, consider installing golf cart anti-theft devices and security locks. These can act as a deterrent to potential thieves and give you peace of mind
This isn’t just about immediate performance; it’s about the long haul, too. Routine multimeter checks help keep your battery running longer and stronger.
By regularly testing your batteries, you can extend the life of your cart and keep those drives as smooth as a golfer’s swing.
| Why Test? | Benefits |
|---|---|
| Health | Assesses individual cells for efficiency. |
| Detection | Identifies faulty batteries early. |
| Diagnosis | Uncovers deeper electrical issues. |
| Longevity | Helps extend overall battery life. |
The importance of maintaining a healthy battery for optimal performance
The battery is the heart of your electric cart, pumping power into every journey around the course. Skimping on battery quality is like playing with a bent club; it just won’t give you the results you need.
Regular checks can help you spot signs of battery fatigue before they bog down your game. Voltage and load tests are the bread and butter of battery health.
For an even deeper dive on how to optimize battery life through proper charging habits, check out our guide on optimizing battery life and the right charging schedule for your golf cart.
And when things get technical, or if doubt creeps in about your battery’s vigor, professional specialists come in swinging with sophisticated tools to diagnose and refine its condition.
Signs of a bad battery and when it needs to be replaced
When your trusty cart starts lagging behind, especially during acceleration or hill-climbing, your power cells might be signaling an “out of juice” alert.
In the physical checkup department, swelling, bulging or even a battery that’s started to weep its contents are clear distress signals. These noticeable symptoms often stem from overcharging, physical mishaps, extreme heat or cold, and the tricky sulfation process.
Now, for the stress test: A load test can be like an intense treadmill session for your battery. A significant voltage drop is like a battery gasping for air – not a good sign. Also, if it’s slow to bounce back to normal voltage levels, it’s likely time to get a replacement.
Additionally, if you see cracks, swelling or leaks, it’s a sign of immediate battery retirement—both for performance and to keep your green escapes safe.
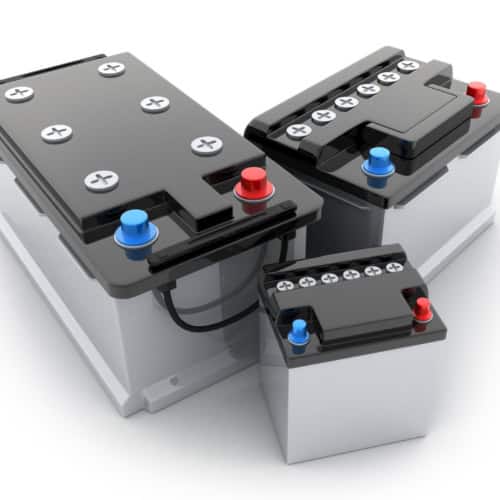
Understanding Golf Cart Batteries
Unlike their car battery cousins, which provide a quick energy burst to start your engine, your faithful golf cart batteries offer a constant, dependable power stream that won’t leave you stranded on the 18th fairway.
Each cell within these batteries is a duo of negative and positive lead plates taking a dip in sulfuric acid. This setup dishes out the volts you need. When one of these cells plays dead, it throws off the voltage balance.
You know you’ve hit a rough patch when your cart starts acting like it’s had a long night. Quirky acceleration and the dreaded slow roll are your clue cards to suspect battery failure. Spot these signs early, and you can save your ride and your round.
Exploring the different types of golf cart batteries
First, there are flooded lead-acid (FLA) batteries, the sturdy workhorses of the lot. They’re tough and reliable, but they’ll ask for a sip of water now and then, and they hate being knocked around.
Next up, Absorbed Glass Mat (AGM) batteries, the ‘no mess, no fuss’ contenders. You pay a bit more upfront, but they’re resilient when the mercury plunges or soars. They’re great for those who’d rather not add “battery maintenance” to their to-do list.
The Gel batteries sit at the cool kids’ table. They handle temperature tantrums like a boss and are the clean freaks of the bunch—no spills, no splashes. But, just like the premium golf clubs, their price tag matches their performance.
And then there’s the lithium-ion brigade, sleek, lightweight and ready for action. They offer high power with none of the weight; but remember, they come with a hefty price, and they need their own special charger.
In addition to maintaining your battery for optimal performance, you can enhance your golf cart’s functionality and comfort with a wide range of golf cart accessories. Explore our selection to find the perfect upgrades to match your golfing style.
Understanding the anatomy of a golf cart battery
Inside the battery’s sturdy case is a lineup of lead-acid cells, each one a mini power plant in its own right. These cells are series-linked sidekicks, working together to throw out the volts your cart needs.
Submerged in that electrifying pool of sulfuric acid are positive and negative lead plates. This is where power is born and sent pulsing through your cart’s veins.
But it’s not just about the individual health of each cell. The health of the team determines if your cart is going to be the tortoise or the hare on the course. Keep those cells in top shape, and you’ll be cruising with confidence.
Remember, every part of your battery’s anatomy plays a big-league role in making sure you get around those 18 holes without hitching a ride back to the clubhouse.
Tools and Equipment Needed for Testing
When it’s about golf cart batteries, you’ve got to have the right gear for the job. Let’s explore all the equipment you’ll need.
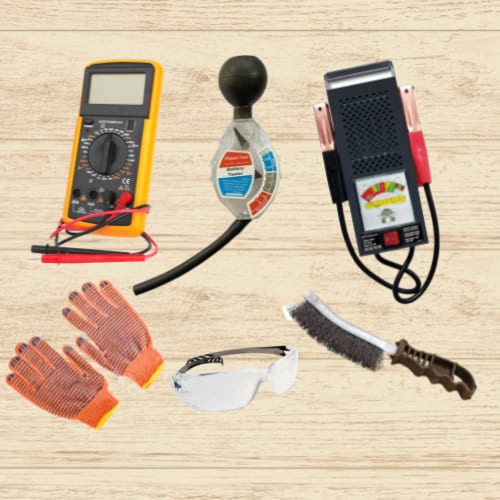
Essential tools for testing golf cart batteries
Imagine you’re tackling the battery beat with a multimeter in your hand— It’s a must-have for clocking volts and amps. But this isn’t the only required tool.
You’ll also need a hydrometer, which probes the electrolyte solution and provides information about your battery’s specific gravity.
In addition, the battery load tester is your muscle for the mission. This tool pitches a load on your battery to see how it stands up under pressure.
And don’t forget, a wire brush is your sidekick for scrubbing away any signs of corrosion on those battery terminals. Clean contacts mean a clear path for power to pass through.
Importance of safety gear when handling batteries
While testing the battery, your eyes need to be shielded. Battery acid doesn’t play nice, and a splash can turn a good day sour in a hurry. So, suit up with safety glasses and don’t remove them during the entire testing process.
Safety gloves are your hand’s best buddy, protecting your grip from any unwelcome chemical handshakes. Prioritize safety as if it’s the 18th-hole putt for the win.
Preparing to Test Your Golf Cart Battery
Step one—plug that charger in. Give the battery a full charge, then let it lounge for an hour or two. This nap time lets the voltage settle down to what it should be.
Once it’s had its rest, grab your digital voltmeter. You’re looking for about 12.6 volts on a fully charged 12-volt battery. That’s the sweet spot.
Now, it’s time to put your battery through its paces with a load test. Does your battery keep its cool when the heat is on? If you’re scratching your head and unsure if your battery’s up to par, flag down a pro battery specialist. They’ll help you make sense out of the testing results.
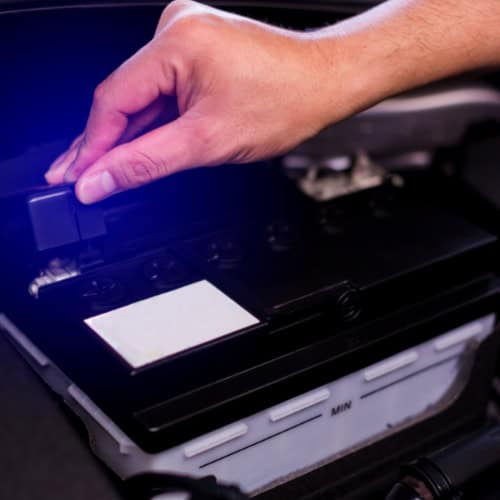
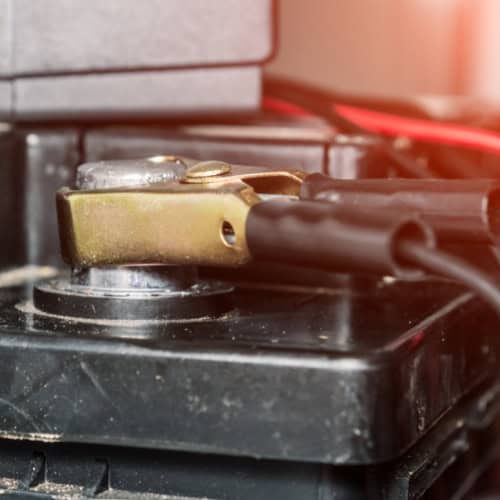
Checking battery terminals for signs of corrosion
Take a look at your battery terminals, and try to spot any acid leaks or grungy terminals. It’s usually due to acid fumes shaking hands with your terminals or if you have low electrolyte levels in your flooded battery.
To clean up the mess, a pinch of baking soda and a splash of water work wonders. Then, spray it with an anti-corrosion solution to keep it minty fresh. Remember, checking electrolyte levels and topping them up stops the corrosion from getting worse.
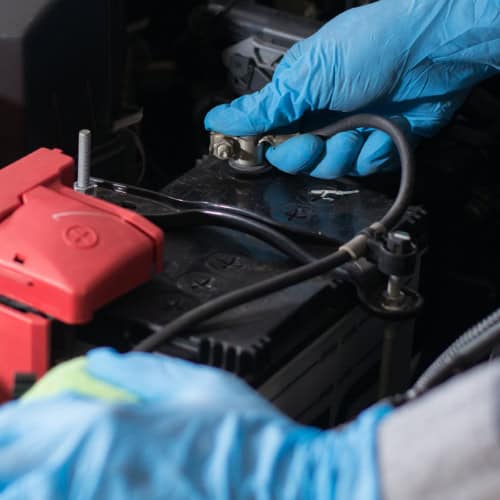
Ensuring proper battery connection and fixing loose connections
Ever missed a putt because of a pebble on the green? That’s what a loose battery connection can do to your cart, throwing a wrench in your game.
Do some detective work and check the points from the battery to the motor, the controller and the charger. If anything’s loose, tighten it up with a wrench or pliers.
Keep that connection (terminals and wires) cleaner than your best club, and you’ll avoid those unwanted power outages.
Checking the water level and adding distilled water if necessary
Your cart battery’s water level is key to a long and healthy life—think of it as the hydration it needs to keep swinging. If the water’s low, give it a drink of distilled water. Keep it topped up, but don’t douse it. Your battery’s innards need some air to breathe too.
Regular peeks at the water level will go a long way. This simple check is the linchpin to your cart battery’s longevity—it’s easy to do and pays off shot after shot. Keep it part of your maintenance routine, and your battery will drive your cart down the fairway for many rounds to come.
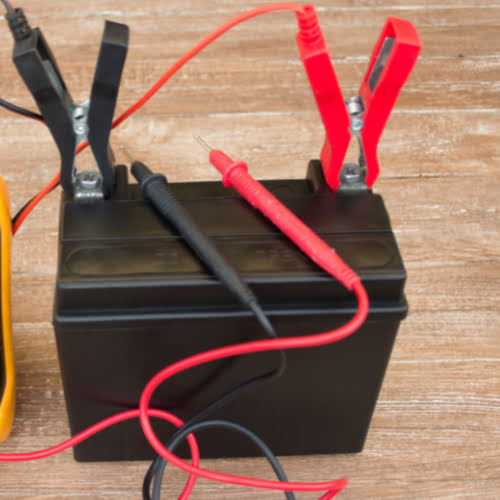
Testing the Battery Voltage
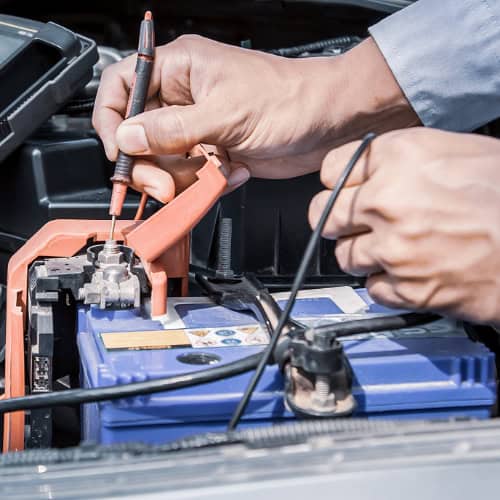
Grab your trusty digital voltmeter. A stellar reading for a fully charged 12V battery hovers around 12.6 volts. Anything below that, particularly under 12.4 volts, might mean your battery’s juice is waning, and it’s not ready to tackle the full 18 holes.
Now, let’s say your voltmeter hints at a healthy 12.4 volts or more. Don’t just do a victory dance yet. You’ll want more than that initial number to ensure you’re not dealing with a dud. Load testing will show if your battery can handle the pressure without buckling.
Step-by-step guide to using a voltmeter to measure battery voltage
First, connect the voltmeter’s positive probe to the battery’s positive terminal, and the negative probe to the negative terminal. Now you’re set to read that voltage, looking for the sweet number: between 12.5 and 12.7 volts. That’s your green light for a battery in top condition.
Interpreting the voltage reading and determining the health of the battery
If you’re seeing 12.7 volts on a 12-volt battery, you’re in major-winning form. If you roll out an 8.4 on an 8-volt, or a sturdy 6.3 on a 6-volt, you’re sitting pretty. But if your numbers are missing the mark—say, more than 1 volt off, you might need a recharge. Give it about 6 hours of juice, then check again.
Reading on the flatter side, below 12.4 volts, whispers that your battery is only partially charged—not quite up for the full 18 holes. Load testing is your closer look. It checks if your battery can hold up when the going gets tough. Remember, use your multimeter on the right setting—for 6V or 8V batteries, make sure you’re dialed in to their particular voltage range.
Load Testing the Battery

Load testing ensures your electric steed can trot through the full 18 holes without faltering. A healthy battery should maintain its voltage.
Apply that load, and keep a keen eye on your battery’s response. Observing minimal voltage drop is what you’re aiming for—evidence that your battery’s ready for the long haul. But if the voltage dips considerably, you’ve got a telltale sign of a bad battery. Be ready for a potential change to keep your game uninterrupted.
Understanding load testing as a more accurate measure of battery health
You know that sinking feeling of a missed short putt? Relying solely on voltage readings can give you that same dismay if they paint a rosy picture while problems lie under the surface. Load testing is the double-check, the second glance. It challenges your cart batteries to show off their true capacity.
Consider this: during a leisurely round, your cart faces hills, cargo, and the occasional longer trek between holes. A load test mimics these challenges. If the battery stands its ground, keeping voltage loss in check, you’ve got a clear indication your cart’s power source is match-fit.
Steps to perform a load test on your golf cart battery
Ensure you’re ready to roll with the right gear—a load tester built for the unique demands of golf cart batteries. Follow these steps:
- Securely connect the load tester to the positive and negative terminals.
- Engage the load.
- Monitor the voltage’s movement over a 15-second stretch—it should remain stable.
- Observe the recovery, seeking a comeback to near-normal voltage.
- Note any substantial voltage dips that may indicate a dying battery.
Maintaining and Extending Battery Life
Establishing a consistent testing routine is as fundamental to your cart’s well-being as stretching is to your game. Timely interventions could mean the difference between a battery lasting beyond expectations or leaving you stranded on the 17th.
Tips for extending the life of your golf cart battery
Regular maintenance checks aren’t just good habits; they’re non-negotiables for ensuring your equipment is ready for action. Scrutinize for damage, ensure a clean connection at the terminals and monitor the water levels.
It’s fair to say that battery care is as much a part of your routine as replacing divots or raking sand traps. You’re protecting the heart of your cart’s electrical system, reducing the likelihood of facing dead cells and extending your battery’s tour of duty on the links.
Proper storage and maintenance during periods of inactivity
When your cart takes a break during the off-season, so should the batteries – removed from the cart and kept in a cozy, climate-controlled place. Just as you wouldn’t neglect your clubs through the winter, don’t overlook your batteries – keep them charged and maintained.
The use of a battery maintainer will ensure they’re in peak condition when it’s time to roll out. Regular recharges during storage can prevent the dreary outcome of total discharge.
Charging and Recharging the Battery
Overcharging your battery could lead to unnecessary damage or even spark a fire. Conversely, undercharging leaves you short of the ideal functional battery you need. It’s about finding that sweet spot where everything is just right – your battery fully charged and primed for the course.
Once you’ve got it fully charged, give it an hour or two’s break. This pause allows things to settle and ensures you get an accurate read on its condition.
Should you find your battery waning prematurely or the charger blinking red flags, don’t immediately blame the battery. Sometimes the culprit could be the charger itself. A charger not in proper working order is as disruptive to a battery as a broken tee is to your drive.
Choosing the Right Battery Charger for Your Golf Cart
Selecting a charger that matches the voltage and chemistry of your cart batteries is fundamental to their lifespan. To avoid the hazard of premature battery issues, you need a charger tailored for deep-cycle batteries.
A quality charger goes beyond mere charging; it needs to vibe with the battery chemistry, whether flooded, AGM, or lithium iron phosphate. Compatibility is key to a functional and durable battery.
You also should recharge your batteries every time they duck below the 50% capacity mark. This is how you sidestep the pesky undercharging issues that could cut your game short.
Testing in Extreme Temperatures
Just as your swing adapts to a gusty headwind or a sun-baked green, your approach to testing cart batteries must shift when dealing with weather’s extremes.
Understanding the effects of extreme temperatures on battery performance
When the mercury plummets or soars, your cart batteries enter a zone of performance hiccups. A battery in frigid conditions can cause issues like response times lag and power wanes.
Conversely, excessive heat can cause your battery’s electrolytes to break into a sweat, diminishing its capacity. In these conditions, the risk of a bad battery or even a hazardous situation skyrockets.
To stay ahead of the game, keep those batteries at room temperature, around 68 degrees Fahrenheit (20° Celsius), for a fair test. After ensuring the batteries at room temperature, proceed with testing using your trusty tools, just like you would on a regular day (as explained earlier).
Frequently Asked Questions
Here are some commonly asked questions to ensure that you are equipped with everything you need to test and maintain your golf cart batteries.
Why is it important to test golf cart batteries?
Testing golf cart batteries is crucial to ensure their efficiency and performance. Regular testing allows you to identify any issues with the battery, such as degradation or failure, before they lead to problems on the golf course.
What are the recommended methods for testing golf cart batteries?
There are two main methods for testing golf cart batteries. The first method involves using a voltmeter to measure the voltage of the battery. The second method is using a hydrometer to test the specific gravity of the electrolyte solution in the battery.
What is the significance of using a hydrometer for testing golf cart batteries?
Using a hydrometer allows you to test the specific gravity of the electrolyte solution in the battery, providing another method to assess the health of the battery. A specific gravity reading of 1.280 is considered good for a golf cart battery.
How do I verify the results of the battery tests?
After conducting the voltmeter and hydrometer tests, it is essential to verify the results with a load tester. This final step ensures that the battery is functioning properly and can handle the load required for powering the golf cart.
What should I do if I suspect issues with my golf cart battery?
Before concluding that your golf cart battery needs replacement, investigate other potential causes of the issues. Check for corrosion on the battery terminals, ensure tight connections and test the charger’s functionality to rule out other factors contributing to power issues.
Final thoughts
Testing your golf cart battery is crucial for maintaining your vehicle and ensuring an enjoyable experience on the course.
By following the comprehensive steps outlined in this guide, you can confidently assess your battery’s health, identify potential issues and take appropriate action to extend its lifespan. Remember to prioritize safety, use the right tools and adhere to the recommended testing intervals to keep your battery performing at its best.
Regular testing, combined with proper charging, storage, and maintenance practices, will not only prevent unexpected breakdowns on the course but also help you maximize your battery’s efficiency and longevity.
Understanding your golf cart battery is key to ensuring a smooth and uninterrupted golfing experience. Having the right power source can make all the difference between a relaxing day on the course and frustrating breakdowns. In our comprehensive guide on golf cart batteries, we discussed the different battery types, proper care and maintenance techniques, and helpful tips to maximize battery life.
If you have questions or comments, please leave them in the comments section below.


I need to test six 8V flooded batteries in a golf cart. They are currently hooked up in sequence. Do I need to disconnect each battery from the series before testing?
For a basic voltage check with a multimeter, you don’t have to disconnect each 8V battery from the series, as long as the cart is off, the charger is unplugged, and there’s no load on the system (key off / tow‑mode). You can put the meter probes directly on each battery’s posts and compare their resting voltages; a healthy, fully charged 8V battery should be around 8.3–8.5V.
If you want to load‑test each battery individually (or you strongly suspect one weak battery), then it’s best practice to disconnect at least one cable from that battery so the load tester is only seeing that single battery and the rest of the pack can’t “hide” a bad one. If you do disconnect, always shut everything down and remove the negative cable first for safety, then reconnect it last when you’re done.