Drive for show, putt for dough.” This famous phrase, coined by South African putting legend Bobby Locke, encapsulates a fundamental truth in golf: putting is the great equalizer. No matter how far you can drive the ball or how precisely you strike your irons, your score ultimately depends on your ability to sink putts.
For both professionals and amateurs alike, putting is often the difference between victory and defeat, between a substantial prize purse and a disappointing finish. It’s not uncommon to hear commentators lament a missed putt on the final hole, emphasizing its significant impact on the leaderboard and prize money.
The good news? Putting is a skill that can be drastically improved with targeted practice and the right attitude. In this guide, we’ll explore a series of putting drills designed to transform your short game. These exercises focus on critical aspects of a solid putting stroke, including distance control, accuracy, and performing under pressure. By mastering these techniques, you’ll be well on your way to lowering your scores and finding more enjoyment on the greens.
- 1) The Importance of Putting Drills
-
2)
7+ Expert Short Putting Drills for Control and Consistency
- 2.1) Drill 1: Multi Station Drill with Single Target and Max Distance Line
- 2.2) Drill 2: Single Station Quadrant Putting Drill
- 2.3) Drill 3: Two Line Putter Head Gate Drill
- 2.4) Drill 4: Three Tee Y-Gate Drill
- 2.5) Drill 5: Putter Head Gate Drill
- 2.6) Drill 6: String Line Putting Drill
- 2.7) Drill 7: Ball Gate Putting Drill
- 3) Additional Putting Drills and Tips
-
4)
Frequently Asked Questions
- 4.1) How often should I practice putting drills?
- 4.2) Can I practice putting drills at home?
- 4.3) What is the most important aspect of a good putting stroke?
- 4.4) How do I know if I have the right eye position when putting?
- 4.5) What should I do if I’m struggling with distance control on the greens?
- 4.6) How can I improve my accuracy on breaking putts?
- 4.7) How do I know which drills are right for me?
- 4.8) What equipment do I need for these drills?
- 5) Final Thoughts
The Importance of Putting Drills
The challenge of putting lies in its deceptive simplicity. Even the world’s top golfers on the PGA Tour sometimes struggle with short putts, highlighting the skill’s complexity. Many golf enthusiasts find putting to be the least enjoyable aspect of the game, yet it remains an indispensable component for success.
Putting drills matter because they directly influence your ability to minimize missed putts and improve overall consistency on the green. Poor speed control and short putt inconsistency are common culprits behind three-putts, a bane for golfers seeking to lower their scores.

Why Putting Drills Matter?
Drills provide a structured approach to refining specific aspects of your putting game, be it improving alignment, stroke path or distance control; dedicated practice with drills helps you isolate and strengthen these skills.
In addition, regular practice with putting drills builds muscle memory and consistency. Repetition ingrains the correct techniques into your muscle memory, making it easier to replicate successful putts under pressure.
Also, knowing you have practiced and perfected your putting technique boosts your confidence on the green. Confidence is key in golf, and a confident putter is more likely to make accurate, decisive strokes.
The Impact of Poor Speed Control and Inconsistency
Inconsistent speed control often leads to three-putts. When you can’t judge the distance correctly, your first putt might leave you too far from the hole, resulting in additional strokes.
Every extra putt adds to your score, making it harder to achieve your target. Reducing the number of missed short putts is crucial for lowering your overall score.
As a result, missing short putts can be mentally frustrating, which can affect your overall game, making it harder to maintain focus and perform well.
To improve your putting skills and reduce these issues, consider practicing with indoor putting greens.
Benefits of Consistent Short Putting
The most direct benefit of consistent short putting is a reduction in your total strokes per round. Fewer missed putts mean fewer added strokes, leading to lower scores. Consistency on the green is also vital for improving your handicap and preparing you for pressure situations (when facing a crucial putt to win a match or to make par).
7+ Expert Short Putting Drills for Control and Consistency
The following are some recommended drills you can adopt to enhance your putting consistency and eventually lower your scores:
Drill 1: Multi Station Drill with Single Target and Max Distance Line
This is one of the most effective putting drills for improving distance control. It helps you establish a consistent pre-shot routine and develop a better feel for various putting distances.
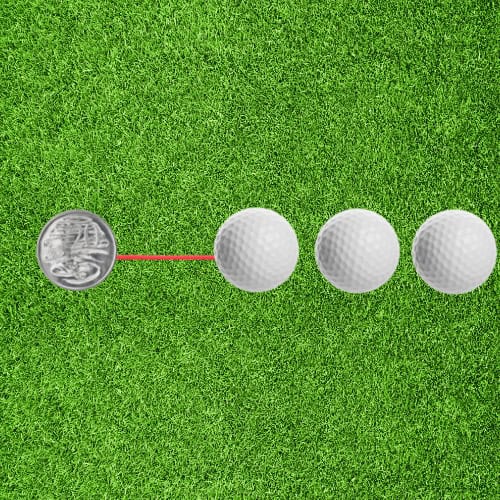
Start by placing a single target (like a tee or a coin) on the green at a distance of your choosing. Then, use a string or a chalk line to create a “max distance” line about 3 feet beyond the target. This line serves as a visual aid to help you control your putting speed.
Next, set up several putting stations at different distances from the target – for example, 5 feet, 10 feet, 15 feet, and 20 feet. Start at the closest station and work your way back, hitting three putts from each station.
The goal is to get each putt as close to the target as possible without going past the max distance line. If a putt rolls beyond the line, it’s considered a miss. Focus on developing a smooth, consistent stroke and pay attention to how the ball rolls and reacts on the green.
As you move through the stations, take note of how your stroke feels and make any necessary adjustments. You may find that you need to adjust your grip pressure, stance or tempo to achieve better distance control.
Drill 2: Single Station Quadrant Putting Drill
The Single Station Quadrant Putting Drill is designed to enhance your precision and consistency on the green. By focusing on rolling putts into a designated area, you can build the accuracy and control needed for short putts.
Use four tees to create a square or quadrant on the green. Each side should be about three feet long. After that, place a golf ball at various distances from the center of the quadrant, starting from one foot and gradually moving back to three feet.
Techniques for Rolling Putts into the Square
Aim to roll the ball so it stops within the marked square. This helps develop a keen eye for distance and control. Use a smooth, pendulum-like stroke and avoid jerky movements to ensure the ball travels on a consistent line.
Try to vary the force of your stroke based on the distance to the square. This practice helps fine-tune your touch and feel on the green.
Building Consistency and Accuracy
Repeat the drill from different distances and angles. This variety helps build a versatile and reliable putting stroke. After each putt, note where the ball stops. If it’s outside the quadrant, adjust your stroke or aim accordingly.
Incorporate this drill into your regular practice sessions so as to developing muscle memory and confidence.
Drill 3: Two Line Putter Head Gate Drill
The Two Line Putter Head Gate Drill is designed to help you maintain a straight putting stroke and improve your consistency and accuracy.
Place two alignment sticks or golf clubs on the green, parallel to each other and about 3 inches apart. The space between the sticks should be just wide enough for your putter head to pass through without touching either stick.
Position a ball in the middle of the gate, and set up to the ball as you normally would for a putt. Your goal is to make a putting stroke that allows the putter head to pass through the gate without making contact with the alignment sticks.
Key points to focus on as you practice this drill
- Keep your putter head square to the target line throughout the entire stroke
- Maintain a smooth, pendulum-like motion with your arms and shoulders
- Avoid any unnecessary wrist movement or rotation
Begin by making short putts of about 3 feet, ensuring that your putter head passes cleanly through the gate on both the backswing and follow-through. As you become more comfortable with the drill, gradually increase the length of your putts to 6 feet and beyond.
If your putter head touches either alignment stick, it’s an indication that your stroke is not straight. This feedback allows you to make immediate adjustments to your technique and develop a more consistent putting stroke.
To add an extra challenge to the drill, try placing a target (such as a tee or a coin) a few feet beyond the gate. Aim to not only keep your putter head within the gate but also to roll the ball over the target. This will help you develop better speed control and accuracy.
Drill 4: Three Tee Y-Gate Drill
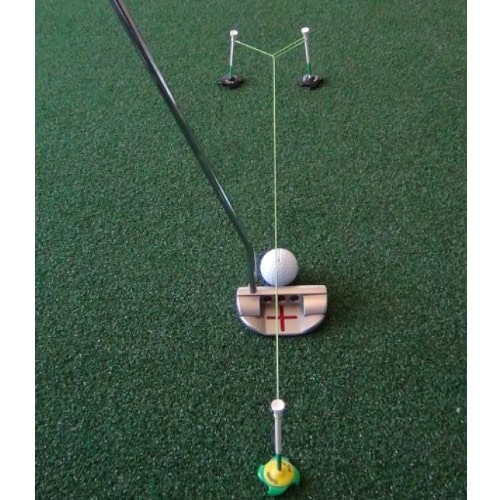
The Three Tee Y-Gate Drill is an excellent way to promote a short, compact putting stroke while ensuring that your putter face remains square to the target.
Creating the Y-Gate
First, position three tees in a Y-shape. Place one tee directly behind the ball and the other two tees about 12 inches apart, forming a V shape in front of the ball. Then, place the ball at the center of the Y, just in front of the base tee.
Promoting a Short, Compact Putting Stroke
Stand over the ball with your eyes directly above it. Ensure your feet are shoulder-width apart, and your stance is comfortable and balanced. Focus on a controlled backswing. The tee behind the ball helps limit your backswing length, promoting a shorter, more controlled motion.
The two tees in front guide your follow-through, as your putter should pass through the V formed by the tees without hitting them, ensuring a compact and straight stroke.
Drill 5: Putter Head Gate Drill
Hitting putts with the center of the putter face is crucial for consistent distance control and accuracy. The Putter Head Gate Drill helps you achieve this by training you to make solid contact with the sweet spot of your putter.
Place two tees in the ground just wider than your putter head. The tees should form a gate that guides your putter during the stroke. Place the ball in the middle of the gate – The goal is to swing the putter through the gate without touching the tees.
Techniques to Avoid Mis-Hits
Ensure your putter face is square to the target line at address. Your eyes should be directly over the ball, and your stance should be balanced. Focus on a smooth and controlled stroke, keep your wrists firm and avoid flipping the putter at impact.
Maintain a steady follow-through, ensuring the putter head passes cleanly between the tees. This helps develop a straight and true putting path.
Enhancing Overall Putting Accuracy
Consistent practice with this drill builds muscle memory, making it easier to hit the sweet spot of the putter. If you hit the tees, adjust your stroke. This immediate feedback helps correct errors and refine your technique.
Try to visualize the ball rolling straight off the putter face. This mental practice reinforces physical actions and improves confidence.
Drill 6: String Line Putting Drill
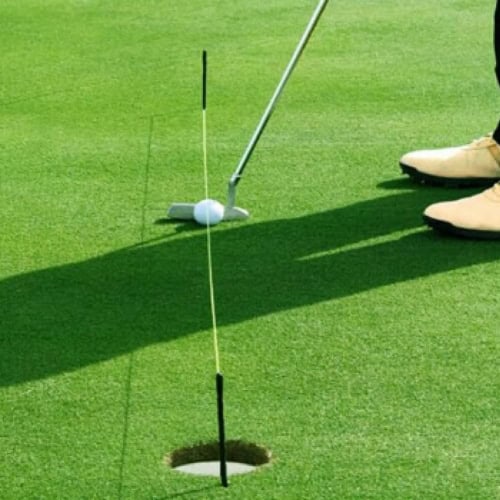
The String Line Putting Drill is a simple yet effective way to improve your aim and alignment on the green. By setting up a visual guide for your putting stroke, you can train your eyes and body to work together for more accurate putts.
To begin, you’ll need a length of string or yarn, two tees, and a few golf balls. Find a relatively flat area on the practice green and follow these steps:
- Push one tee into the green at your starting point.
- Tie one end of the string to the tee.
- Stretch the string out in the direction you want to putt, ensuring it’s taut.
- Push the second tee into the green at the end of the string, creating a straight line.
Encouraging Precise Aim and Proper Eye Position
Place a golf ball on the string, about a foot away from the starting tee. Take your putting stance, aligning your feet, hips and shoulders parallel to the string.
Your eyes should be directly over the ball and the string line. If you’re not sure, use the “drop the ball” drill: hold a second golf ball in front of your dominant eye and drop it. If it lands on top of the ball you’re addressing, your eye position is correct.
Improving Aim and Alignment
Start with short putts, focusing on keeping the putter face square to the string at impact. As you make each stroke, watch how the ball rolls along the string. If it veers off, you’ll know you need to adjust your aim or alignment.
As you become more comfortable with the drill, gradually increase the distance of your putts. You can also experiment with different slopes and breaks by setting up the string line at various angles.
To further enhance your alignment skills, consider incorporating golf alignment sticks into your practice routine. These tools can help you visualize your swing plane, improve your stance, and perfect your putting technique.
Drill 7: Ball Gate Putting Drill
The Ball Gate Putting Drill is an excellent way to practice starting your putts on the correct line and avoiding the common mistakes of pushing or pulling the ball.
To set up the Ball Gate Putting Drill, you’ll need two golf balls and your putter. Place one ball on the green, serving as your target, and place the second one about 3-4 inches behind it, creating a gate. After that, align the gate with your desired starting line for the putt.
Starting Putts on the Correct Line
Address the ball as you normally would, ensuring your putter face is square to the gate. Focus on making a smooth, pendulum-like stroke, aiming to send the ball through the center of the gate.
If your putt rolls through the gate without hitting either ball, you’ve successfully started the ball on the correct line. If the putt hits one of the gate balls, it indicates that you’ve either pushed or pulled the putt, and you need to adjust your stroke accordingly.
Avoiding Pushes and Pulls
A push occurs when the ball starts to the right of your intended line (for right-handed golfers), while a pull starts to the left.
To avoid these errors, pay close attention to your putter face alignment at impact. Make sure the face remains square to the gate throughout your stroke. You can also experiment with different grip pressures and stroke lengths to find what works best for you.
Additional Putting Drills and Tips

While the nine putting drills discussed earlier are highly effective, here are some additional drills and tips to help you take your short game to the next level:
Clock Putting Drill
The Clock Putting Drill involves placing balls at various positions around the hole, mimicking the hours on a clock face. This drill helps you practice putts from different angles and distances, improving your ability to read greens and control your speed.
Star Putting Drill
In the Star Putting Drill, you place five balls in a star pattern around the hole, with each ball about 3 feet away. This drill focuses on short putts and helps build confidence in your ability to hole out from close range.
Drawback Putting Drill
The Drawback Putting Drill involves placing a ball 3 feet behind the hole and attempting to putt it into the hole. If you miss, draw the ball back to its original position and try again.
This drill helps you develop a feel for the correct speed and line needed to hole short putts consistently.
Speed Control Drills
To improve your speed control, try putting from various distances to a target ball or tee placed on the green. Focus on getting your putts to stop as close to the target as possible, without worrying about the hole.
When you become more consistent, move the target farther away to challenge yourself.
Competitive Putting Drills
Incorporate an element of pressure into your practice by competing against yourself or a practice partner. Set up a putting course or play putting games like “Around the World” or “PIG” to simulate the pressure of a real round.
Tips for Success
Here are more tips to set you up for success:
- Maintain consistency in your practice routine, focusing on proper technique and a positive mindset
- Experiment with different drills and variations to keep your practice sessions engaging and challenging
- Use visualization techniques to mentally rehearse successful putts before executing them
- Make practice fun by incorporating putting games and challenges into your routine
- Practice putting on different types of greens and slopes to prepare for various course conditions
Frequently Asked Questions
As you begin to incorporate putting drills into your practice routine, you may have some questions about how to make the most of your time and effort. Here are answers to some of the most frequently asked questions about putting drills:
How often should I practice putting drills?
Aim to practice putting drills for at least 10-15 minutes per session, 3-4 times a week. Consistency is key to improving your putting performance.
Can I practice putting drills at home?
Yes, many of the drills mentioned in this guide can be adapted for at-home practice. You can use a putting mat or create a simple setup in your living room or backyard.
What is the most important aspect of a good putting stroke?
Consistency is the most important aspect of a good putting stroke. Focus on maintaining a smooth, repeatable motion and a square putter face at impact.
How do I know if I have the right eye position when putting?
Use the eye position drill described in this guide to ensure your eyes are directly over the ball. This will help you align your putts more accurately and improve your consistency.
What should I do if I’m struggling with distance control on the greens?
If you struggle with distance control on the green, practice drills that focus on distance control, such as the Multi Station Drill and the Ladder Drill. These will help you develop a better feel for the speed of the greens and improve your ability to control the distance of your putts.
How can I improve my accuracy on breaking putts?
The Ball Gate Putting Drill is an excellent way to practice starting your breaking putts on the correct line. Focus on reading the green accurately and aligning your putter face perpendicular to the starting line of the putt.
How do I know which drills are right for me?
The best putting drills for you will depend on your specific strengths, weaknesses and goals. To determine which drills are right for you:
– Assess your current putting performance and identify areas for improvement.
– Choose drills that target those specific areas, such as aim, speed control or pressure situations.
– Experiment with different drills and pay attention to which ones feel most challenging and beneficial.
– Seek feedback from a golf coach or experienced playing partner to help identify areas for improvement.
What equipment do I need for these drills?
Most putting drills require only basic equipment, such as:
– Your putter
– Golf balls
– A putting green or practice surface
– Alignment tools (string, chalk, alignment sticks, etc.)
– Targets (tees, coins, cups, etc.)
While some specialized training aids can be helpful, they’re not essential for most drills. Focus on using what you have available and being creative with your setup.
Final Thoughts
This comprehensive guide has explored a range of putting drills designed to help you improve your performance on the greens. Each drill targets a specific aspect of the putting stroke, from distance control to accuracy and confidence.
By incorporating these drills into your regular practice routine and focusing on the fundamentals of your setup and stroke, you can develop a more consistent and effective putting technique. Keep in mind that the key to success is consistent, focused practice and a willingness to learn and adapt.
Many golfers struggle to find the right putting grip, which can significantly impact their putting accuracy and consistency. To address this, we’ve created a separate guide on how to grip the putter.
As you progress in your putting journey, celebrate your successes, learn from your mistakes, and continue to experiment with new drills and techniques. With dedication and practice, you’ll soon be holing more putts, reducing your scores, and enjoying the game of golf like never before.
To further enhance your putting practice, consider incorporating proven putting improvement devices into your routine.
So, grab your putter, head to the practice green, and start unlocking your putting potential today.